My blog (that I need to update more frequently!) was featured on Remodelaholic today! I love love love this blog, and I was super surprised to see that my post on my master bedroom was going to be featured. Go HERE to check it out! Thanks Remodelaholic!
Saturday, November 19, 2011
Sunday, October 9, 2011
Stencils and fall decorations
I am bad at blogging. Sorry to be so sporadic and inconsistent with this blog :(. I have found some time in the last month or two to do a few crafts in the midst of a pretty hectic and crazy schedule. I bought some stencils a few months ago to do a project for our master bedroom. There was one big blank wall that needed a little help.... but I couldn't figure out what would be an inexpensive option. Recently, I saw a canvas that said "everyday I love you" in Lulu, a fun store in downtown Franklin, that I decided to try to make.
So... I bought some stencils. In the store they looked smaller than they did when I brought them home, so ended up needing two canvases to stencil the phrase onto instead of one. Good thing the canvases I bought came in a pack of two. I stenciled them on the white canvas using black paint. The black was a little too black for me, so after it dried I lightly brushed some white paint over the whole canvas to lighten it up a bit. Then I took a piece of sand paper and sanded over the entire canvas to give it a distressed look. Here is how they turned out.


The project cost me about $15, and I have already used the stencils again, so it was definitely a cost effective addition to our bare wall :).
This afternoon, I used the stencils to make a "Fall" banner for our mantle. I already had the garland up, I just added the burlap pennants to it. I saw this banner on pinterest and have been wanting to make something similar for our home.
Here is the one I saw on pinterest:
 Here is the one that I made:

Here is a glimpse at our other Fall decorations.


 There is chili cooking in my crock pot right now and there is a super beautiful maple tree turning bright red in the backyard. Fall is here, and I am loving it. This is definitely one of my favorite times of the year. I hope you all are enjoying this season too! Happy Fall!
So... I bought some stencils. In the store they looked smaller than they did when I brought them home, so ended up needing two canvases to stencil the phrase onto instead of one. Good thing the canvases I bought came in a pack of two. I stenciled them on the white canvas using black paint. The black was a little too black for me, so after it dried I lightly brushed some white paint over the whole canvas to lighten it up a bit. Then I took a piece of sand paper and sanded over the entire canvas to give it a distressed look. Here is how they turned out.


The project cost me about $15, and I have already used the stencils again, so it was definitely a cost effective addition to our bare wall :).
This afternoon, I used the stencils to make a "Fall" banner for our mantle. I already had the garland up, I just added the burlap pennants to it. I saw this banner on pinterest and have been wanting to make something similar for our home.
Here is the one I saw on pinterest:


Here is a glimpse at our other Fall decorations.


Sunday, August 28, 2011
kitchen table make-over
Helllooooo :). I'm really bad at blogging. I think about what I want to put on the blog a lot, but I am bad at actually putting out the effort to get my thoughts/projects/what we're up to on the blog. I thought life would slow down once summer came. It did not, so now I'm hoping life will slow down now that school is back in session. Probably not :). Even though life has been a tad bit busy as of late, we (Brian and I:) are really thankful for where God has brought us and to be a part of a lot of great things going on in our lives and in the life of Station Hill, and blessed with some great friends to spend time with and together live life with. God is good. In the midst of the craziness, I have found time to do some projects at our house. One of the things I recently worked on was staining our kitchen table. We have received quite a bit of furniture, for FREE, from our families. So blessed and so thankful. Our kitchen table came from Brian's Granny's house. It is a really beautiful table, but the color of the wood didn't really fit with all of the dark wood in the rest of our house. I have been wanting to try to stain it for awhile now, but I have been a little bit nervous about messing it up and not being able to make it look beautiful again. I read a bunch of tutorials on staining tables, and I finally decided to give it a chance. Here are a few before pictures:


 The last one is the table with out the extra leaf in the middle. We decided to keep it with the leaf in it. It fits the space better.
Here is what I did:
Sanded the top of the table and the seat of the chairs for a LONG time. The wood was super shiny, so it took me a long time to get it to the point where the wood was no longer shiny and felt a little bit rough. The stain soaks in better when the shiny surface is gone. Then I wiped the table and chairs down and let them dry. To stain the table, I brushed on a layer of dark walnut stain and let it soak and then wiped off the excess with a washcloth. I let the stain dry, lightly sanded the table again, and put on another layer of stain. I did this three times. I don't think I let the stain soak in long enough before wiping it off so I had to do multiple coats to get it dark enough. After the 3rd coat had dried, I brushed on a coat of clear polyurethane (satin finish). I sanded it after it dried and then re-applied a second coat. I let the table dry for 24 hours, and then I lightly sanded the table again to give it a distressed look.
For the chairs: After they were sanded, I primed them and then painted them white to match the rest of the chair. I am planning on distressing the edges using the same color stain that I used on the table. I will do that soon and post a picture :).
Here is the finished product. Thankfully I didn't mess it up too bad. I think once the chairs are distressed I will like the look of the table a lot more.


I'm not sure why I have been so scared of staining this table for so long. It was definitely a lot easier and harder to mess up then I expected :). I'll blog about some of my other projects soon. Here is the recent project I did for our bedroom (the "every day I love you" canvas) that I will blog about once I put a picture in the frame :). Then it will be complete.
 Have a great Monday!


Here is what I did:
Sanded the top of the table and the seat of the chairs for a LONG time. The wood was super shiny, so it took me a long time to get it to the point where the wood was no longer shiny and felt a little bit rough. The stain soaks in better when the shiny surface is gone. Then I wiped the table and chairs down and let them dry. To stain the table, I brushed on a layer of dark walnut stain and let it soak and then wiped off the excess with a washcloth. I let the stain dry, lightly sanded the table again, and put on another layer of stain. I did this three times. I don't think I let the stain soak in long enough before wiping it off so I had to do multiple coats to get it dark enough. After the 3rd coat had dried, I brushed on a coat of clear polyurethane (satin finish). I sanded it after it dried and then re-applied a second coat. I let the table dry for 24 hours, and then I lightly sanded the table again to give it a distressed look.
For the chairs: After they were sanded, I primed them and then painted them white to match the rest of the chair. I am planning on distressing the edges using the same color stain that I used on the table. I will do that soon and post a picture :).
Here is the finished product. Thankfully I didn't mess it up too bad. I think once the chairs are distressed I will like the look of the table a lot more.


I'm not sure why I have been so scared of staining this table for so long. It was definitely a lot easier and harder to mess up then I expected :). I'll blog about some of my other projects soon. Here is the recent project I did for our bedroom (the "every day I love you" canvas) that I will blog about once I put a picture in the frame :). Then it will be complete.

Saturday, July 30, 2011
burlap wreath
Welp... While at work on Thursday, I started loosing my voice until I pretty much had none. I thought I had just talked too much (sometimes I definitely talk too much). Then the sore throat came, then the fever, then the HORRIBLE body aches. I guess it was more than just talking to much. We had a lot of fun things planned for the weekend.... breakfast with Arley and ML, Pucketts to hear Carl Wayne, 5k to raise money for orphans in Haiti, some friends coming over to our house, farmer's market to hear Dennis Mihalek's band.... and so on. FUN WEEKEND!! Due to this illness, our weekend instead consisted of movies on the couch. I also had lots of time to look at some of my favorite blogs and pinterest (my new love). I saw a wreath on THIS blog and I decided to use some of my sick time at home to make a similar wreath for the front door... since I already had all the materials at my house.


This is the first time I looked at the picture of the wreath since way before I decided to make one like it. I think I now need to add a few more burlap circles to mine, but for now it will be just fine. Here is how I made my wreath.
I already had this wreath wrapped in fabric, but I had some other flowers on it that were pretty plain looking. I removed the flowers and used this wreath for my base for the burlap circles. (The pictures are taken with my cell phone... sorry!)

I cut out lots of circles out of burlap and two different left over fabric I had from other projects.


Then I just pinned them in place around the wreath and hung it on the door with some green ribbon.

I also made a chalkboard sign for my sugar jar to match the one I made for the Flour awhile ago. Chalkboards and burlap are taking over my house.

I'm glad doing a little crafting made this sick weekend at home a little bit more enjoyable. I guess the Lord new I needed a restful weekend and this was pretty much the only way that was going to happen. Hope to see you when I am no longer quarantined to my couch.
Wednesday, July 20, 2011
master bedroom redo
The week we moved in we painted most of the downstairs thanks to the help from a few friends and because we were trying to paint before the movers arrived with all of our furniture. We decided to hold off on the master bedroom. A year later it is finally done (almost). Here is what it looked like before we moved in.... this picture does not give the ugliness justice.

The paint color seriously looked like poop. This was also the color of our kitchen (who wants their kitchen to look like poop?!). The kitchen is now wedgewood gray (which is actually more like a cheerful blue), and our bedroom also finally got a few coats (not coates:) of paint. I usually enjoy painting, but I was a little bit intimidated by our bedroom. It has tray ceilings, and there were a few cracks in the ceiling and dry wall nails that had popped through, so we decided to hire a professional to do the work for us. Carl Wayne Meekins came to the rescue. He goes to our church and stays busy playing the guitar and singing and to my surprise, painting! We were happy to hire someone we knew and trusted to get the job done, and Carl Wayne did an amazing job. The cracks are all gone, and you would have never known they were there. The paint colors we chose were Comfort Gray on the walls and tray, and Rice Grain on the ceiling. They are both Sherwin Williams colors. I usually stick with Benjamin Moore and the Restoration Hardware colors, but I found out about these colors on one the blogs I read, Nesting Place, and so I decided to try them out. At first, I thought it was a little too blue and not enough gray for my taste, but once the room was decorated, I was really really happy with the color! Here are some pictures with details of where I bought some of the items for our bedroom. We were able to do the whole thing pretty cheap with some DIY projects and cheap buys from my favorite, Ikea.
Here is what it looks like now:


I bought some black frames from IKEA for $7 a piece and put yellow scrapbook paper in them that I already had. I also got the cute white frame from Ikea for a whopping 99 cents and I found the metal tins at Kroger on clearance. I can't remember how much... I just know they were cheap. The candle is from Anthro... a gift from my good friend Kristen. It smells amazing. 


The paint color seriously looked like poop. This was also the color of our kitchen (who wants their kitchen to look like poop?!). The kitchen is now wedgewood gray (which is actually more like a cheerful blue), and our bedroom also finally got a few coats (not coates:) of paint. I usually enjoy painting, but I was a little bit intimidated by our bedroom. It has tray ceilings, and there were a few cracks in the ceiling and dry wall nails that had popped through, so we decided to hire a professional to do the work for us. Carl Wayne Meekins came to the rescue. He goes to our church and stays busy playing the guitar and singing and to my surprise, painting! We were happy to hire someone we knew and trusted to get the job done, and Carl Wayne did an amazing job. The cracks are all gone, and you would have never known they were there. The paint colors we chose were Comfort Gray on the walls and tray, and Rice Grain on the ceiling. They are both Sherwin Williams colors. I usually stick with Benjamin Moore and the Restoration Hardware colors, but I found out about these colors on one the blogs I read, Nesting Place, and so I decided to try them out. At first, I thought it was a little too blue and not enough gray for my taste, but once the room was decorated, I was really really happy with the color! Here are some pictures with details of where I bought some of the items for our bedroom. We were able to do the whole thing pretty cheap with some DIY projects and cheap buys from my favorite, Ikea.
Here is what it looks like now:

After the room was painted Comfort gray, I recovered my previously blue diy headboard with some gray chevron fabric I ordered from Tonic Living. I had wanted the chevron pattern to be horizontal but it wasn't wide enough to cover the whole headboard that way. Oh well... I still love the fabric!! Here is the blog post with how I originally made the headboard.

Another addition were the curtains. I found the white curtains at IKEA for $20 and the rods there for $1.99 a rod!! I love IKEA. The pillow with yellow flowers is from Target. I saw it on Young House Love a long time ago, and I have been wanting to buy it ever since. I was waiting for it to go on sale, but it never did :( so I used a gift card so it didn't seem as bad. It was only $25, but to me it still seemed like a lot to spend on a pillow that's only purpose is to look cute :).
I also made a little reading corner in our room with a chair I bought at IKEA for only $49... And it's actually comfortable. The side table was $7 at IKEA and the magazine rack was $9.

The circles on the wall are quilting circles that were only $1 a piece at Hobby Lobby. I just put the extra fabric in them I had left from my headboard and some other fabric I already had and hung them on the wall. So cheap and easy!! I am going to add a lamp to this corner and maybe even a foot rest if I can find one for a good price. I also made the flower on the pillow with a little (a lot) of hot glue and glued it right on the pillow. Here is a tutorial on making fabric flowers.

I also made a little arrangement with the quilting circles, a "C" I had from our wedding decor, and a cheap mirror I bought awhile back at the Spring Hill antique mall for less than $10.


I need to re-paint my dresser and buy some candles for the thing sitting on top of my dresser, and then that part of the room will be finished.
I bought some black frames from IKEA for $7 a piece and put yellow scrapbook paper in them that I already had. I also got the cute white frame from Ikea for a whopping 99 cents and I found the metal tins at Kroger on clearance. I can't remember how much... I just know they were cheap. The candle is from Anthro... a gift from my good friend Kristen. It smells amazing.


We still have a few things to do. I need something for above our bed. I was going to put the sunburst mirror I recently made there, but it was way too big, so I'm trying to find something else. I have a few ideas for the wall across from our bed that I need to work on. We also have to pick a paint color for the bathroom. I think I am going to go with a gray that actually looks gray and not blue :). As you can see from the below picture, we have started putting samples on the wall, I just haven't decided which color to go with quite yet.

I am so happy to not have to look at those dirty brown walls any longer and have a more calm and light bedroom to come home too. Let me know if you know of any paint colors that would look good in the bathroom. Thanks for reading!
Sunday, July 17, 2011
Sunburst mirror
I saw this great DIY mirror on one of my favorite blogs... The Lettered Cottage.

We have been working on renovating our master bedroom, so I decided to try to tackle this mirror to put above the bed. Mine definitely did not turn out as good as Layla's on the Lettered Cottage, but I am happy with the results. The only problem was that I did not cut my shims down 4 inches like they did, so my mirror ended up being realllly big and therefore it did not fit over our bed :(. So... I found it a home on the wall leading upstairs. Those walls were really bare and need a little something anyways. Also, you can see it when you are sitting in the downstairs living room, so I think it worked out to be a nice addition to our walls.
Materials you need:
Cedar Shims (found at Home Depot. I had to ask where they were located since until a week ago I had no earthly idea what shims were. You will need to packs)
Liquid Nails - Home Depot
3 floral rings - Michaels
8 inch mirror - Hobby Lobby
White spray paint - I used Rustoleum's Heirloom White from Home Depot
mirror hanging kit
I basically just copied this tutorial from the Lettered Cottage, except for that my shims didn't line up quite as perfectly as their's did :(, I think it's because I glued shims around the 2 outer rings first, and then I glued rings around the smaller ring and then stapled the 2 separate rings of shims together. If I ever make another one, I will not do it separately like I did but instead line up the shims for the smaller ring over the other shims on the bigger rings and attach them that way. That might not make sense unless you see it in person. I also spray painted my shims white before gluing the mirror on. Here are pictures of how my mirror turned out:


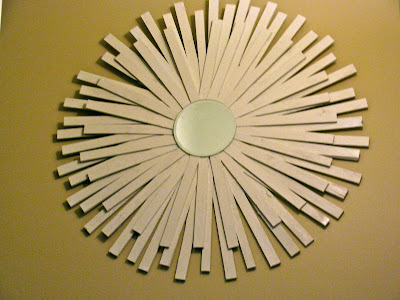
This was a pretty inexpensive not too difficult addition to a very empty wall! If you like it, you could totally make one too! Have a great Sunday.

We have been working on renovating our master bedroom, so I decided to try to tackle this mirror to put above the bed. Mine definitely did not turn out as good as Layla's on the Lettered Cottage, but I am happy with the results. The only problem was that I did not cut my shims down 4 inches like they did, so my mirror ended up being realllly big and therefore it did not fit over our bed :(. So... I found it a home on the wall leading upstairs. Those walls were really bare and need a little something anyways. Also, you can see it when you are sitting in the downstairs living room, so I think it worked out to be a nice addition to our walls.
Materials you need:
Cedar Shims (found at Home Depot. I had to ask where they were located since until a week ago I had no earthly idea what shims were. You will need to packs)
Liquid Nails - Home Depot
3 floral rings - Michaels
8 inch mirror - Hobby Lobby
White spray paint - I used Rustoleum's Heirloom White from Home Depot
mirror hanging kit
I basically just copied this tutorial from the Lettered Cottage, except for that my shims didn't line up quite as perfectly as their's did :(, I think it's because I glued shims around the 2 outer rings first, and then I glued rings around the smaller ring and then stapled the 2 separate rings of shims together. If I ever make another one, I will not do it separately like I did but instead line up the shims for the smaller ring over the other shims on the bigger rings and attach them that way. That might not make sense unless you see it in person. I also spray painted my shims white before gluing the mirror on. Here are pictures of how my mirror turned out:


This was a pretty inexpensive not too difficult addition to a very empty wall! If you like it, you could totally make one too! Have a great Sunday.
Tuesday, July 12, 2011
Fun with Students
This summer was our one year anniversary in Spring Hill! This past year went by so fast, and Brian and I are so thankful to the Lord for all He is doing in our lives and in the life of our church. I have really enjoyed helping out with the students this past year at Station Hill. It has been so incredible to look back at how the students have grown in depth this past year. These middle school and high school students LOVE Jesus. They find so much joy in serving Him and in drawing closer to Him. They have been such an encouragement to me in my walk with Christ as well this past year. One thing that has really touched my heart is their heart for missions. There is growing passion inside them to reach the ends of the earth with the Gospel. It is such a beautiful thing.
We recently had some of the students over to our house to make bracelets for orphans in Russia. Craft Hope organizes different projects to help people in need around the world. I am always checking out their projects since I love to make some crafts :), and when I saw the one for orphans in Russia, I knew our students would be interested. Craft Hope partnered with Orphan Outreach to collect bracelets to hand out to girls in orphanages in Russia. No, the bracelets are not really providing any physical needs, but they are showing these orphans that people on the other side of the world love them and care about them, and hopefully they also, through the ministry of Orphan Outreach, saw the love Jesus has for them. It was a great way for the students to spend some time thinking about orphans and doing something to serve others. We also had a lot of fun making them!


Below is a picture from our end of the school year party with the students. It was a great end to a great year!

Brian and I also recently had the opportunity to go with the students from the Station Hill and the BBC campus to Panama City Beach for camp. We really enjoyed hearing Aaron Bryant teach some awesome truth from God's Word, be led in worship by Dave Hunt, participate in some great small group Bible study time, and have tons of fun on the beach. One of the SH students trusted in Christ as his Savior during the week and Brian had the privilege of baptizing him. That was by far the best part of beach camp.


I am looking forward to continuing to serve with this ministry and see how God uses these students to impact the world with the Gospel!
Also... on a lighter note :).... We remodeled our master bedroom. It involves some gray paint (that looks blue), chevron fabric, some great Ikea buys, and a cute yellow pillow. I'm almost done and will post pictures of the projects I did soon. I hope you're having a great summer!

Wednesday, June 15, 2011
Burlap lamps and friends.
While I was shopping (I mean looking:) in downtown Franklin one day, I noticed tons of burlap lamp shades.... and that just grew my burlap obsession to even greater depths. I don't think my husband thought that was possible :). So, I came home and decided to attempt to cover one of my lamp shades in burlap.
All I needed for this project was burlap, hot glue, scissors, and some fabric for the flower I made for the lamp.
I just started at the top and glued the burlap to the inside of the lamp shade like this:


Added a little flower for some flare.
And ended up with this.

I think I am going to spray paint the lamp post white as well. I think that will make the burlap stand out more. I'll post a picture when I finish that part.
Our friends Aaron, Kristen, and their sweet baby Noah came to visit us recenlty and we had a great time showing them around Nashville. Brian makes a great tour guide. We had the best time showing them some of our favorite places, and we are already looking forward to their next trip here! Here are a few pictures from their visit:


LLLL UUUU !! :) Loved having some Liberty alum in my home! Thanks for coming guys. Come again soon :).
Subscribe to:
Posts (Atom)